Sorry if this thread is long. I didn't just want to direct link to the thread on TU though you can read more about it over there.
It all started with this video from youtube showing a Chinese factory adding foil to some jigs.
http://youtu.be/-_Ioeq1KHk4I figured somebody would know how they did it but alas got nowhere. So ..... I decided to figure it out for myself.
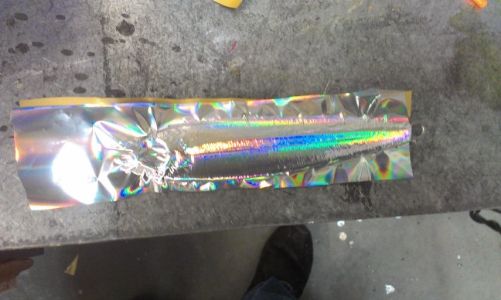
I bought some holographic foil meant for a paper foiling machine off of EBAY for $30 for 3 rolls.The foil is 3" wide by 100' long.
Then I bought some of this foil adhesive binder intended for adding foil to screen printed T-shirts.It cost me $30 for this quart container.

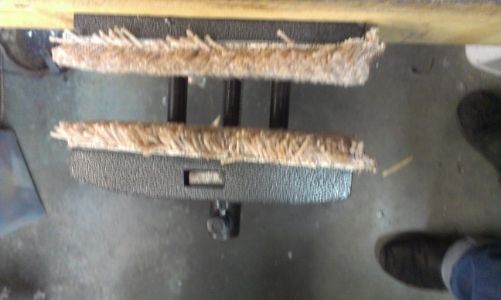
The jig is firmly clamped on the end in a pair of Hemostats.
Then a piece of foil is cut to fit each side and set aside. You want it slightly longer and wider than your jig but not so long or wide your wasting foil.
I then use a cheap paint brush to apply as thin a coat as I can of the binder. It is water soluble so cleanup is easy and the brush reusable.
One quart of this stuff will do hundreds of jigs.
Leave off the binder where you do not want foil such as in the 3D eye sockets of your jig.
Next I heat the entire jig with my heat gun set at ~400*f.
The binder kicks over at 325* so it needs to at least be that hot for this to work.
Next I apply the foil to each side being careful not to wrinkle it.
I then clamp the entire jig and hemostats in a carpet lined wood workers vise as the jig is still very hot.

The jigs come out looking as though the foil was vac sealed to the jig.basically a poor mans heat press.
I have looked into heat presses but they are expensive and have hard flat heat platens and none of my jigs are completly flat.
The heat presses are used to make T-shirts etc.

Then I paint the seams with a metallic RC car paint. You can also paint other parts of the jig at this time with whatever color paints you desire.
This is also when I add the 3D eyes to the jig.
The next step is to add a top coat of Devcon 2 ton (D2T) 30 minute epoxy to seal it all onto the jig. Hang your jig to cure for 12-24 hours.
The final step is to add split rings and hooks.
These are hard to get a good picture of but look awesome in the hand.
Anybody who has seen these in person loves how they look.
They are super shiny and very good looking jigs.
I haven't tried them yet but I will soon on some pike and lake trout.
Then Halibut etc. next summer.

You can read the entire thread over on TU in case I left something out or to learn how another guy does his with a different adhesive.
